Sunday, April 21, 2013

Red Mangrove - Rhizophora mangle

For my final project I decided to render the Red Mangrove. I chose to do the rendering in watercolor to reflect the environment of the plant which lives mostly in brackish water (half fresh and half salt water).
Before I began painting on the large paper I did a few practices.


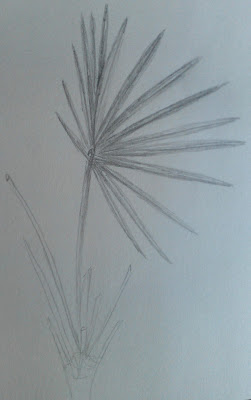
So first I began with practicing sketching the plant. I decided to later use a more side view of the plant rather than the one above. In the drawing above the leafs closest to the camera appeared bigger than the ones farther away, however it looks odd in the drawing.


Above is my completed practice painting. I worked on watercolor paper and played with the variety of greens and brushes. The leafs are different colors as I played with more yellow tones or blue tones. I decided that the leafs needed to have a blue tinge to them. Also, I painted the roots as if they were sitting in water as shown in one of the reference photos.


Above is my completed project. I added less leafs than before to keep the overall painting simple. I added a textured background wash to simulate background foliage. To make the roots appear to be standing in water I added extra water to the ends of the roots to fade them. The leafs have a blue tinge to them and some have the center line depending on the angle. 

I feel that I need more practice with watercolor. I did not always have the patience to wait for the paint to dry before adding second layers. In addition, I believe that the leafs and stems need more definition so that they don't appear to be flat. Overall, I am pleased with how the project finished and I feel that it does accurately represent the Red Mangrove plant. 

Friday, March 29, 2013

Coral Cove

Our next large scale project will be based on a local beach called Coral Cove. It is also referred to as Blowing Rocks due to the large rock formations on the shore. When the waves hit the rocks, the water shoots into the air as if it were 'blowing.'


I decided to select a young Red Mangrove plant for the subject of my illustration:

Red Mangrove Plant at Low Tide

Same Red Mangrove Plant at High Tide
I plan on rendering the plant in water colors hopefully with the surrounding water. I am excited for this new challenge with a different material.

The Saw Palmetto

Here is my finished artwork for the Greenway Project


It is titled: "Saw Palmetto, Serenoa repens"

Artist Statement/Abstract:


This scientific study illustrates the Saw Palmetto, Serenoa repens, which was found in the Abacoa Greenway. The rendering shows two palm fronts interconnecting and their natural bright green colors. The final illustration was completed using colored pencil with a layering and burnishing technique. This specimen was selected due to its symbolism as an iconic Florida species. Although it is constantly found across Florida, native Floridians may not place much attention on its presence. However, this illustration aims to earn the attention of the viewers so that it's beauty can be admired.


I am generally satisfied with the work. I enjoyed working with colored pencil and creating a thick layer so that the leaves have a shiny texture. I believe that scientifically speaking, the leaves are not perfectly drawn but the colors are exact. The illustration shows a "perfect" palm frond, but naturally the fronds have split brown ends depending on the dryness on the environment and the weather that affects the plant. 

This project has been entered into my college's undergraduate symposium that will take place on April 12th. I am anxious to hear whether it will be accepted. 

Monday, February 25, 2013

The Greenway

Beginning on February 11 we spent four days in the local Greenway to begin our first large scale project. We spent the days wandering the Greenway and sketching possible objects to render.

Here are some photographs from the first week in the Greenway. I was in love with my surroundings there but couldn't find any particular thing to concentrate on during the first week.


Later I finally decided to concentrate on the Saw Palmetto, Serenoa repens. It is an iconic plant of Florida and is found all over the Greenway, such as in the last photo above.


Above are two renderings that I did in the Greenway to work with composition for my final project. I am settling on the second image of the two palm fronds interweaving. I believe this will be interesting to look at. I will render this in large scale with colored pencil.

I hope I will be able to properly render the design of the plant including its color, shadow and texture.

Caiman crocodilus

February 6, 2013

Today we got to pick a fossil or bone to render. I chose part of a skull of a Spectacled Caiman, Caiman crocodilus. Below is a photo of a live Spectacled Caiman.

http://dinets.travel.ru/speccaiman05.jpg
Here is the skull I selected looking from above:

Spectacled Caiman skull
The skull is incomplete, only showing where the eyes sat and part of the jaw. However, this was an interesting piece to practice with since it has so many shadows and textures. My rendering below:


Overall I was very pleased on how my skull turned out. However I need to practice more on texture which is what challenges me most. 

Tillandsia recurvata

January 30, 2013

Today we were given a piece of Ball Moss, Tillandsia recurvata, to render in pencil and colored pencil.


In the colored pencil rendering I used Prismacolor colored pencils with colors: Limepeal, Olive Green, Light Umber, Parrot Green and Sepia.

I love working with the different colors in the moss rendering to create different values. Although the moss is very green, the more blue colors were necessary to create shadows of the write shade. Sepia allowed me to create more of a brownish tone to the stem. 

Garnet Crystal

January 23, 2013

Today we selected a different inanimate object to render. I selected a piece of Garnet Crystal as shown below. This was a challenge to create the multiple textures found in the rock. However, I believe I need more practice with this kind of material!


Monday, February 4, 2013

Update on the Monarchs

January 22, 2013

After spending a day studying the Monarchs in the Arboretum I decided to check up on the caterpillars every day to see how they were progressing. I have been able to make many more photos of caterpillars and the milkweed plant. So here are two drawings I did of a study of the caterpillar's stripes and the Milkweed flowers:

Monarch Caterpillar stripe study. Each of the stripes are labeled by their color.
Reference photograph.
Drawing of Tropical Milkweed flowers and buds.
Reference photograph of Milkweed flowers and buds.
On this day I wrote in my sketchbook: Over the past few days I've been closely watching the two Milkweed plants (Asclepias curassavica) in the Arboretum. I was excited to find a large Monarch caterpillar that seems ready to begin it's chrysalis process. It was on a dead branch in a nearby bush and no longer eating the Milkweed plant. It was still. However that evening (1/21) there was some rain and wind and this morning (1/22) I was distraught that the caterpillar was no where to be found. However, after some searching I found it on the ground still attached to the branch, and alive! I encouraged the caterpillar back into the bush where it began crawling again. Later that day I found the caterpillar still in the same bush and motionless again. I will continue to watch the caterpillar in hopes of seeing it's chrysalis process or the final product.

Eventually I did find that caterpillar beginning it's chrysalis:
Handing in a "J" shape to prepare for chrysalis. (1/24)

The following morning. (1/25)

Sadly, the chrysalis picture above never fully formed. Typically it is supposed to be more rounded out and bright green in color:

Source: http://www.obsessionwithbutterflies.com/img/butterfly/Monarch%20Chrysalis2.jpg

Otherwise, I got lots of great pictures of the caterpillar and butterfly so I will keep checking the plants for any chrysalis in the future!

Shading Spheres

January 16, 2013

Another assignment given to us was to shade 7 circles to make them look like spheres using 7 different pencil techniques to give the sphere it's value. The techniques I used, in the order shown are vertical hatching, cross hatching, blending with tortilion, stippling, scribbling, curvilinear lines, and horizontal hatching.


It was a good exercise to practice shading again. However, I wish I had had a ball to practice working with the cast shadow. I don't believe the cast shadow is correct in these drawings. 

Introducing the Tropical Milkweed & Monarch

January 14, 2013

This day was spent in the Arboretum here on the university's campus. It's generally a garden that has been tended by the students here.
The Arboretum's Pavilion
Around 9:45 AM this is what I wrote in my sketchbook about the environment:
The day is cool, around 77 degrees F (according to my cell phone) with partly cloudy skies. There is a slight breeze but otherwise still. The sun is just beginning to break through the clouds.
I'm seated in the Arboretum's pavilion in one of the four wooden benches. The pavilion has climbing plants on the walls and roof which is attracting multiple black and yellow butterflies. Surround the pavilion are more butterfly plants with the same butterflies and small flying insects. The paths in the Arboretum are unkempt and full of small holes and green crawling plants and weeds.
The butterfly I was observing was this one:

Zebra Longwing, Heliconius charitonius, Florida's state buttefly
High-resolution Image of Zebra Longwing
Source: http://www.flheritage.com/facts/symbols/symbol.cfm?id=5

My own photograph of the Zebra Longwing from the Arboretum.

As I wandered the Arboretum for something to concentrate on drawing, which was our assignment, I came across a plant that is familiar to me: the Tropical Milkweed, Ascelpias curassavica. 

Tropical Milkweed
I decided to focus my drawing on this plant. I noticed that it had multiple flowers and seed pods, a few of which were opening. From my past experience with this plant I know that it is poisonous to most animals except a few caterpillars, one of which being the Monarch, Danaus plexippus. 

A opened and closed seedpod from the Tropical Milkweed. 
Photograph of the seedpod I was studying.

Up-close of an individual seedpod from the Tropical Milkweed with the fibers.
Detail of a leaf from the Tropical Milkweed. 

After investigating the plant for some time, a Monarch butter fly approached the plant on numerous occasions and I realized that it was laying eggs on the leaves: 
Eggs laid by the Monarch butterfly on the Tropical Milkweed. Small cream-white colored with an oval shape.
Monarch butterfly laying eggs on the Tropical Milkweed. You can see its abdomen touching the underside of the leaves to lay the eggs.
I was very excited to see the butterfly and took numerous additional photos of the butterfly and the eggs. I was also very excited to find a few small caterpillars on the plant. 
I described them in my sketchbook: Upon further investigating the eggs, I did notice multiple caterpillars of two sizes, two larger ones and at least four smaller ones. The caterpillars are generally underneath the leaves and are yellow black and white in color with black antennas. They have two pointed front "feet" and an additional 8 "feet pads" that stick to the leaves.

Young Monarch caterpillar on Tropical Milkweed.
Large Monarch caterpillar on Tropical Milkweed.

Overall, I enjoyed the day in the Arboretum and studying the Monarch caterpillars and butterflies. As the blog will show I continued to visit the Milkweed plant over several days to continue studying the caterpillars in hope of finding a chrysalis - the stage in which the caterpillar forms into a butterfly.

Remembering the Graphite Pencil

January 13, 2013

Our class began with simple exercises in order to practice using multiple kinds of graphite pencils. The set of pencils that I have range from 9H to 9B, with H being the hardest and B being the softest. It didn't take long for me to get back into the habit of working with the graphite pencils through the exercises given to us. We were assigned to create multiple sheets of value scales of the various pencil techniques and using all the different kinds of pencils: 4B, 2B, 2H, 4H and 6H.
These line techniques create value depending on the thickness and proximity of the lines to each other.

 
Crosshatching technique: using perpendicular lines to create value.

Shading: using a tortillion, or a stump of shading paper to create value. First I created horizontal hatched lines and blended the lines together with the tortillion.

Wavy lines: using circular, wavy or other kinds of fluid lines to create value in various forms.

Horizontal hatched lines.

Squiggly lines: using swirls and circles in proximity to create value.

Stippling: using small dots in various shapes and proximity to create value

Left-diagonal hatching 


Right-diagonal hatching

Vertical hatching


Overall, this practice allowed me to remember how to use a graphite pencil and practice with various techniques to create value. Value allows drawings to have a form and look more three dimensional rather than two dimensional.